In brief
- 💧 Treat your water system like a food surface: regular cleaning plus smart pipe maintenance keeps gunk from turning into a biofilm party.
- 🦠 Real bacteria removal is about process: flush, disinfect, rinse, verify—then prevent re-growth.
- 🧪 Use chemical treatment strategically (not randomly): dose matters, contact time matters, and some chemicals don’t mix.
- 🚿 Fixtures and “dead legs” are common trouble spots; mapping your lines makes it easier to sanitize effectively.
- 🧰 Testing and habits (temperature control, flow, filter hygiene) turn one-time hygiene into long-term water safety.
Your plumbing is basically the backstage crew of your home: invisible, essential, and only noticed when something smells off, tastes weird, or stains the sink. The tricky part is that a “clean-looking” faucet can still be fed by pipes lined with mineral scale, soft sludge, and biofilm—exactly the cozy layer microbes love. When people say they want to sanitize a plumbing system, they often mean three different things at once: remove buildup, disinfect to knock down microbes, and keep the water system stable so problems don’t bounce back next week. That’s why the best approach isn’t one magic product; it’s a repeatable routine with a clear goal, a realistic level of effort, and a little respect for how water behaves in pipes.
To make this practical, we’ll follow a simple storyline: a fictional homeowner named Maya moves into a 15-year-old house and notices a musty odor in the shower, slow hot-water recovery, and occasional specks in aerators. Nothing dramatic—just the classic signs that pipe maintenance and hygiene have been “later” tasks for a long time. Her plan: clean, disinfect, verify, and then prevent. If that sounds like overkill, ask yourself this: would you drink from a reusable bottle you never wash, just because it “looks fine”?
Sanitize Your Plumbing System: Start With a Map, Not a Miracle Product
Maya’s first win came from doing something most people skip: she mapped her plumbing. Not with fancy software—just a sketch showing the main shutoff, water heater, branches to bathrooms, outdoor spigots, and any filters or softeners. This matters because sanitize is a system-level goal; if you miss a branch, it can reseed the rest with biofilm and undo your effort.
She also looked for “dead legs,” those rarely used runs (a capped line from an old remodel, a seldom-used guest bath, an outdoor line in winter). Low-flow zones are where stagnation and temperature drift give microbes a comfortable environment. It’s not paranoia; it’s physics. Water that doesn’t move loses disinfectant residual (if you’re on municipal water) and equalizes to room temperature, which can encourage growth.
SEO-friendly plumbing inspection checklist for smarter pipe maintenance
Before any chemical treatment, Maya handled the basics: she removed faucet aerators and showerheads, soaked them, and brushed out grit. That’s not “deep sanitation” yet—it’s clearing the bottlenecks so flushing later is actually effective. She also checked the water heater temperature and learned her tank was set low to save energy. That’s fine, but temperature management is part of water safety: lukewarm storage can support microbial persistence depending on local conditions and usage patterns.
Then she ran a high-flow flush—cold first, then hot—at the furthest fixtures. The goal is to push out old water and loosen debris. Think of it like rinsing shampoo out of hair: you don’t add conditioner before you rinse properly. She timed it, too, because “a quick run” is vague; a deliberate flush is measurable.
What surprised her most was the “cleaning vs disinfect” distinction. Cleaning removes the stuff microbes hide in; disinfecting reduces the microbes themselves. If you disinfect without cleaning, you may kill what’s exposed but leave the habitat intact. That’s why a lot of people swear a product “did nothing”—they skipped the prep.
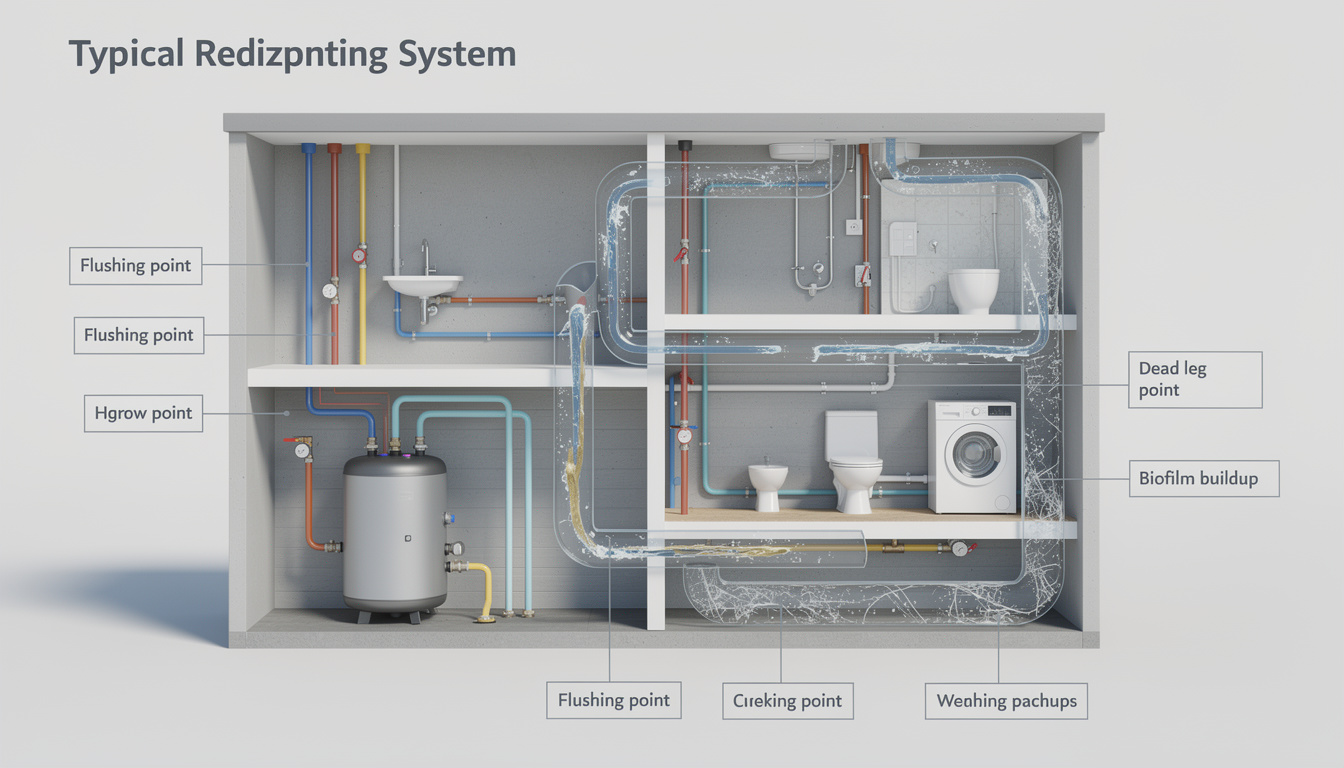
Best Cleaning and Flushing Methods to Sanitize a Home Water System
If your water system has been neglected, the first big lever is controlled flushing plus mechanical cleaning at endpoints. Maya treated her plumbing like a set of small “reactors”: each faucet, shower, and hose bib collects its own mix of minerals, rust flecks, and slime. Clearing those endpoints improves flow and helps the next steps reach where they need to go.
Deep cleaning routine for fixtures (without drama)
She soaked aerators and showerheads in a descaling solution compatible with the fixture finish, then rinsed thoroughly. For the gross-looking rubber nozzles on the showerhead, she used a soft brush. That’s not just aesthetic; mineral scale can shelter microbes from disinfectants, making bacteria removal harder later.
For drains, she avoided the common trap of mixing random products. Drain cleaners aren’t the same as whole-house plumbing sanitation, and the wrong combo can create hazardous fumes. Instead, she focused on physical removal (hair, gunk) and targeted cleaning for odor sources. The point is to keep sanitation intentional, not chaotic.
How long should you flush to support water safety?
Instead of guessing, Maya used a simple method: flush until temperature stabilizes and runs consistently, then continue a bit longer at the furthest point. For cold lines, “stabilize” means the water reaches its normal cold baseline; for hot lines, it means the heater is delivering steady hot without pulsing. The reason is that stable temperature is a practical proxy for “you’ve replaced most of the stagnant water in that run.”
She did it zone by zone: upstairs bath, downstairs bath, kitchen, laundry, outdoor. This avoids pulling all fixtures at once and causing pressure swings that shake loose debris into aerators. Slow and steady felt boring—but boring is good when the goal is hygiene.
She also learned that flushing is not a one-off. If a guest bathroom sits unused, do a weekly quick flush. If you go on vacation, flush on return. It’s the easiest habit that supports water safety without buying anything.
The next logical step after good cleaning is deciding whether you need disinfection, and if so, which chemical treatment makes sense for your setup.
Chemical Treatment to Disinfect Plumbing: Chlorine, Peroxide, and What Actually Works
This is where people either overdo it or get scared and do nothing. Maya chose a middle path: she matched the chemical treatment to the situation and followed label directions like it was a recipe. Disinfectants are powerful; they’re not “more is better” products. Dose, contact time, and compatibility with materials (rubber, stainless, older pipe) matter.
Choosing a disinfectant: what each one is good at
Chlorine-based products are common for shock disinfection, especially when you need broad microbial control. They’re effective, widely understood, and relatively inexpensive. The downside is odor, potential material stress at high doses, and the need for careful flushing afterward. Hydrogen peroxide-based options can be effective and may have a different odor profile, but they still require correct dosing and contact time.
What Maya did not do: mix disinfectants, improvise concentrations, or treat her system like a chemistry lab. If you want hygiene, you need consistency and safety, not guesses.
Sanitize safely: a practical dosing and contact-time mindset
Maya’s rule was simple: pick one method, follow it completely, then verify by smell/clarity and (when relevant) basic testing. She planned the day so nobody needed to use water during the contact time. She also removed or bypassed devices that shouldn’t be exposed to certain chemicals (depending on manufacturer guidance), because some filters and softeners have specific sanitation procedures.
Here’s a quick comparison table she used to keep decisions sane:
| Option | Best for | Watch-outs | Comfort factor |
|---|---|---|---|
| 🧪 Chlorine shock disinfect | Broad bacteria removal across lines and tank | Odor, needs thorough flushing; don’t mix with acids | 😬 Strong smell but effective |
| 🫧 Peroxide-based disinfect | Targeted sanitation with different byproducts | Still needs correct dose/contact time; check material compatibility | 🙂 Often perceived as “cleaner” smelling |
| 🔥 Heat (thermal flush) | Supportive method in some systems | Scald risk; may not reach all branches evenly | ⚠️ Needs careful handling |
| 🚿 High-flow flushing | Removing stagnant water and loose debris | Not a standalone disinfect; can stir up sediment | 😌 Easy, low cost |
After disinfection, she flushed each line until odor dropped to normal and water ran clear. She didn’t stop at “good enough” at the kitchen tap, because the furthest fixtures can hold treated water longer. The system is only as clean as its last branch.
Once the plumbing was disinfected, Maya focused on what keeps it that way: ongoing hygiene habits and smarter pipe maintenance, so she isn’t repeating a big treatment every few months.
Pipe Maintenance Habits That Keep Your Plumbing Sanitized Long-Term
Sanitation that doesn’t stick is basically just an expensive weekend. Maya built a maintenance rhythm that fits real life: small tasks done on schedule beat heroic deep cleans done once a decade. The goal is to avoid biofilm getting a foothold again, and to keep sediment from collecting in quiet corners.
Weekly and monthly routines for water safety
Every week, she flushed low-use fixtures for a couple of minutes—guest shower, basement sink, and an outdoor spigot in season. That simple habit reduces stagnation and helps keep disinfectant residual (if present) from dropping to zero in those branches. It also makes odors easier to notice early.
Monthly, she cleaned aerators and checked the toilet fill valves for grit. Tiny screens clog first, and they’re your early-warning system. If you consistently see particles, it’s a clue: your water heater might be shedding sediment, or your supply line has scale/rust issues worth addressing.
She also logged changes: “musty smell returned,” “hot water slowed,” “white flakes in aerator.” It sounds nerdy, but it’s how you spot patterns. A plumbing system tells you what it needs—if you’re paying attention.
Filter and softener hygiene (the forgotten middle layer)
Many homes have some kind of filter or softener, and people treat them like magic boxes. They’re not magic; they’re maintenance devices. Maya followed the manufacturer schedule for replacements and sanitation cycles. An overdue filter can become a contamination source, which is the opposite of water safety.
She also learned to avoid “stacking” solutions. If you install a new filter and also do a chemical treatment the same day, you can shorten filter life or push debris into the cartridge. She spaced changes and let the system stabilize between steps.
Here’s the routine she posted inside her utility closet so nobody “forgets”:
- 🗓️ Weekly: flush low-use faucets/shower for hygiene and freshness
- 🧼 Monthly: remove and scrub aerators; quick cleaning of showerhead nozzles
- 🧯 Quarterly: check for leaks and corrosion; confirm water heater temp supports water safety
- 🧰 Twice a year: sediment flush for tank heater (if applicable) as part of pipe maintenance
- 🧪 As needed: targeted disinfect cycle after plumbing work, flooding, or long vacancy
The best part is that this doesn’t feel like constant work. It’s like brushing your teeth: a little routine prevents a lot of pain later, and your plumbing stays boring—in the best possible way.
Targeted Bacteria Removal After Events: Renovations, Flooding, and “Weird Water” Days
Even well-maintained plumbing can get thrown off by events: a renovation where lines are opened, a street main break, a long power outage, or a flooded basement. Maya had a minor kitchen remodel, and when the plumber reconnected lines, she treated it as a trigger for targeted sanitation. Freshly disturbed pipes can release debris, and any open connection is an opportunity for contamination.
After plumbing work: sanitize with a clear sequence
Her sequence was straightforward: flush first, then disinfect, then flush again, then clean endpoints. The logic is simple: you want to remove loose particles before disinfection, because debris can “consume” disinfectant and reduce effectiveness. Afterward, you clean aerators because they catch whatever got mobilized.
She also ran and drained the hot water to refresh the tank and lines (depending on heater type). That’s not about panic; it’s about restoring normal conditions quickly so microbes don’t exploit the chaos.
When to escalate: signs you shouldn’t ignore
Maya set personal red flags. If water turns persistently discolored, smells like sewage (not just mild “stale”), or if multiple fixtures show slime and recurring odor despite cleaning, that’s when you move beyond casual DIY and consider professional testing or service. The point of sanitation isn’t to play detective forever; it’s to restore confidence in water safety.
She also avoided the “masking” trap: pouring fragrance cleaners into drains, using a stronger and stronger chemical treatment without diagnosis, or replacing fixtures without addressing upstream issues. When problems repeat, it’s usually flow, temperature, or a neglected zone—not bad luck.
And yes, she learned one more lesson the hard way: if you sanitize aggressively but keep a rarely used line stagnant, that line will undo your work. In plumbing, prevention isn’t a slogan; it’s the only strategy that scales.
How often should I sanitize my plumbing system?
If your home has normal municipal water and no unusual events, focus on routine cleaning and flushing plus basic pipe maintenance. Full-system disinfection is usually done after plumbing work, long vacancy, flooding, or recurring odor/slime issues. The goal is targeted hygiene, not constant chemical treatment.
Is flushing alone enough for bacteria removal?
Flushing helps by replacing stagnant water and moving out loose debris, but it doesn’t reliably disinfect biofilm inside pipes. For true bacteria removal, you typically need a combined approach: cleaning endpoints, controlled flushing, and (when justified) a disinfect step with proper contact time.
Can I use bleach to disinfect my water system?
Chlorine-based products are commonly used to disinfect, but the key is correct concentration, contact time, and thorough post-flush. Never mix bleach with acids or other cleaners. If you have filters, softeners, or sensitive materials, follow manufacturer guidance before any chemical treatment.
Why does a musty smell come back after I clean the showerhead?
Often the odor source is upstream: biofilm in a branch line, a low-use section of plumbing, or a temperature/flow issue that encourages regrowth. Cleaning the fixture helps, but long-term water safety usually needs regular flushing of low-use lines and periodic maintenance of aerators, valves, and the hot water setup.